Important Disclaimer
BatteryStorageHQ provides educational content and estimates only. We are not certified installers, financial advisors, or electricians. Always consult with licensed professionals.
Solar panel mounting systems come down to three honest choices: fixed roof mounts, ground mounts, and adjustable tilt racks. The mount you pick sets your tilt angle, your snow-shedding, and — more than people realise — your long-term leak and corrosion risk. A flush roof mount is cheapest but locks you to your roof’s pitch; a ground mount costs more steel but lets you set the ideal angle, which at a northern latitude can mean 20–30% more usable winter harvest.
I learned the hard way that the panel is never what fails on a mount — the fastener, the flashing, and the structural load path are. Glass lasts 25 years; a badly bedded lag bolt leaks in three. This is the practical mounting breakdown behind the broader home solar panel guide, written from the perspective of someone who has to climb up and re-torque it after a Swedish winter.
Roof Mounts: Cheapest, but Mind the Penetrations
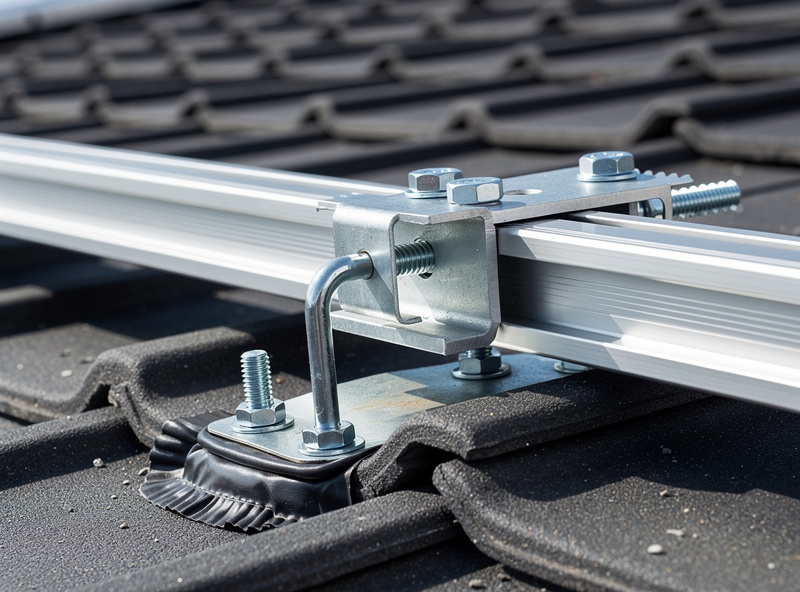
Roof mounting is the default for most homes because it uses space you already own. A rail system bolts to the rafters through the roof covering, the panels clamp to the rails, and the whole array sits a few inches off the deck for airflow. The two things that matter are hitting structure (lagging into a rafter, never just the sheathing) and waterproofing every penetration with proper flashing, not a smear of sealant that fails in a few seasons.
The fixed-tilt drawback is that you inherit your roof’s pitch and orientation. A 45° south-facing roof is close to ideal at high latitude; a shallow 15° roof gives a summer-biased curve and holds snow. You can add small tilt legs to lift the rear edge, but on an exposed roof that turns every panel into a sail, so wind loading has to be checked. Whatever you mount, the array adds dead and wind load to the structure, which ties straight into the safety thinking behind the whole system.
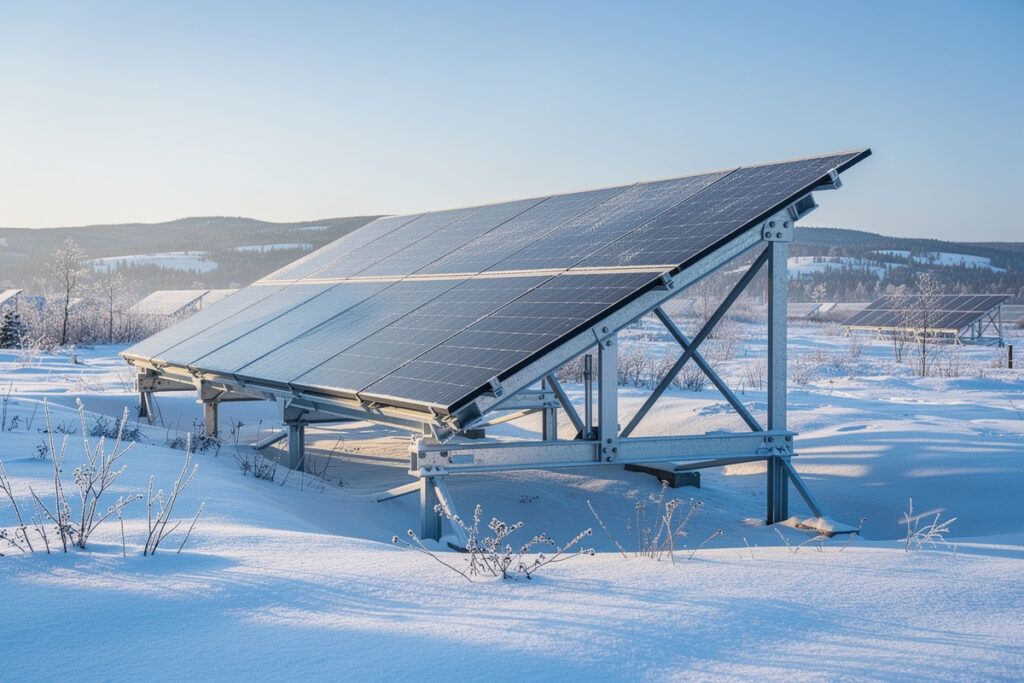
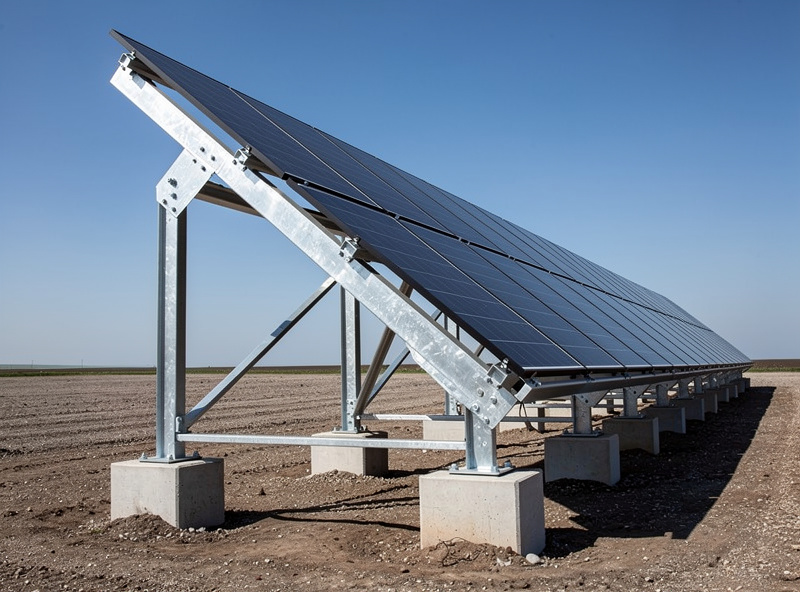
Ground Mounts: Best Angle, Best Access
If you have the land, a ground mount is the connoisseur’s choice. You set the exact tilt and azimuth you want, you can clean and clear snow without a ladder, and there are no roof penetrations to leak. The cost is more material — concrete footings or driven posts, a steel or aluminium frame engineered for your wind and snow loads — and usually a permit and a trench for the cable run back to the charge controller and battery.
The footing is the part people underestimate. A ground array is a large sail bolted to the earth, and the uplift in a winter gale is enormous. Concrete piers sized to local frost depth and wind load, or properly rated ground screws, are not optional. Get the foundation right and the rest is bolt-together; get it wrong and the first real storm rearranges your array. The ideal tilt a ground mount lets you set is exactly the lever that fixes the winter shortfall the sizing calculator exposes.
Tilt Angle and Orientation
Orientation first: in the northern hemisphere, true south (not magnetic south) is the baseline, and small deviations east or west cost surprisingly little — within 15° of south you lose only a few percent. Tilt is the bigger lever. A common rule of thumb sets fixed tilt roughly equal to your latitude for a balanced annual yield, or latitude plus 10–15° to bias production toward winter, when a battery system is most starved.
At high latitude the winter bias is worth real money. A steeper panel catches the low winter sun more squarely and — critically — sheds snow instead of banking it. A panel flat under 10 cm of snow makes zero watts no matter how good the cell is, so in snow country the steep, smooth, winter-biased tilt earns back its slightly lower summer peak many times over. This interacts with the panel choice only at the margins; geometry dominates.
The Hardware That Actually Matters
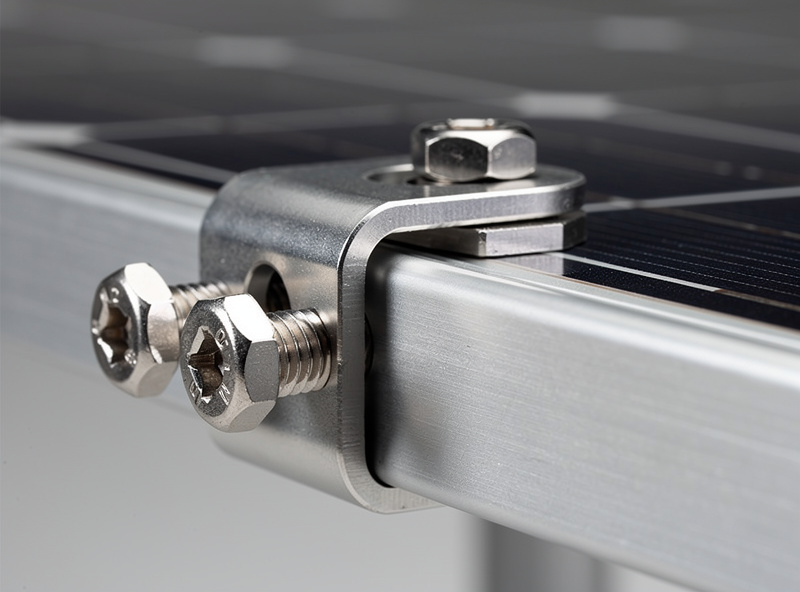
Mounting hardware is where corrosion and galvanic mistakes hide. Use anodised aluminium rail and stainless fasteners, and keep dissimilar metals from touching where water sits — an aluminium rail bolted directly to a galvanised bracket with a steel bolt will corrode at the junction within a few wet winters. For roof work, a proper rail and clamp kit with flashed feet beats improvising with generic brackets every time.
For a smaller array or a shed, simpler options exist: adjustable tilt brackets let you set and change the angle by hand, and ground mount kits bolt up quickly once your footings are in. Whatever the scale, torque the clamps to the panel manufacturer’s spec — over-torquing cracks the frame, under-torquing lets panels walk loose in wind cycling.
Adjustable and Seasonal Tilt
Adjustable racks let you change the tilt twice a year — steep for winter, shallow for summer — to chase a few extra percent of annual yield. On a ground mount this is realistic manual labour: two angle changes a year, ten minutes each. On a roof it is rarely practical. Honestly, for most people a single well-chosen winter-biased fixed angle beats the hassle of seasonal adjustment, because the gain is modest and the winter bias is where a battery system needs help anyway.
Motorised tracking — panels that follow the sun across the day — exists but I steer residential builders away from it. The extra harvest rarely justifies the cost, the moving parts, and the failure points, especially at high latitude where the winter sun barely arcs and the summer surplus is already wasted. Spend that money on more fixed panels instead; static silicon is the most reliable thing in the whole system.
Snow and Wind Loading
Structural loading is the part that has to survive 25 winters, and it is not glamorous. Snow load is a downward force the frame and roof must carry; wind load is largely uplift, trying to peel the array off. Both are dictated by local building code figures, and both scale with array size. A steep tilt sheds snow but presents more area to the wind; a shallow tilt resists wind but banks snow. There is no free lunch — you engineer for your worst case, not your average one.
The cable management is part of the structure too. UV-rated cable, secured so it cannot chafe against a frame edge as the array flexes in wind, prevents the slow abrasion that eventually shorts a string. Add per-string fusing and DC isolation at the array, the same discipline that protects the rest of the system — the mount is not just mechanical, it is the first link in the electrical chain back to the inverter.
Mounting type comparison
| Mount type | Tilt control | Leak risk | Cost | Best for |
|---|---|---|---|---|
| Fixed roof (flush) | None (roof pitch) | Moderate (penetrations) | Lowest | Good-pitch south roofs |
| Roof with tilt legs | Some | Moderate–high | Low–medium | Shallow roofs needing winter bias |
| Fixed ground mount | Full (set once) | None | Medium–high | Land available, ideal angle |
| Adjustable ground | Seasonal | None | Higher | Chasing peak annual yield |
| Tracking | Continuous | None | Highest | Rarely worth it residentially |
My Verdict
If your roof faces roughly south at a decent pitch, a quality flush rail kit with proper flashing is the pragmatic, cheap answer — just respect the penetrations. If you have land, a fixed ground mount at a winter-biased tilt is the better system: ideal angle, easy snow clearing, no roof leaks. Skip tracking, skip seasonal adjustment unless you enjoy the ritual, and spend your real attention on footing strength, stainless fasteners, and a tilt steep enough to throw the snow off.
Frequently Asked Questions
What is the best angle to mount solar panels?
For balanced annual output, set tilt roughly equal to your latitude. To bias production toward winter, when a battery system is most starved, use latitude plus 10 to 15 degrees. The steeper angle also sheds snow, which matters more than the small summer loss at high latitudes.
Are roof or ground mounts better for solar panels?
Roof mounts are cheaper and use existing space but lock you to your roof’s pitch and create leak-prone penetrations. Ground mounts cost more in steel and footings but let you set the ideal tilt, clear snow easily, and avoid roof leaks. Ground wins if you have the land.
Do solar panels need to face true south?
In the northern hemisphere, true south is the baseline, but small deviations cost little. Within 15 degrees of south you lose only a few percent of output. Tilt angle matters more than minor azimuth error, so do not over-optimise orientation at the expense of a good tilt.
How do I stop solar mounts from corroding?
Use anodised aluminium rail with stainless fasteners and keep dissimilar metals from touching where water collects. An aluminium rail bolted straight to a galvanised bracket corrodes at the junction within a few wet winters. Isolate dissimilar metals and torque clamps to the panel maker’s spec.
Is a solar tracker worth it for a home?
Rarely. Trackers add cost, moving parts, and failure points for harvest gains that fixed panels can match by simply adding more static modules. At high latitude the winter sun barely arcs and summer surplus is already wasted, so fixed mounting is the more reliable choice.
Will a steep tilt help shed snow?
Yes, and it is one of the strongest reasons to mount steeply in snow country. A panel flat under snow produces zero watts, so a steep, smooth, winter-biased array that sheds snow quickly recovers far more energy than its slightly lower summer peak gives up.