Important Disclaimer
BatteryStorageHQ provides educational content and estimates only. We are not certified installers, financial advisors, or electricians. Always consult with licensed professionals.
Top balancing is the mandatory setup step that determines whether your DIY LiFePO4 pack lasts 5 years or 15 years. In ~40 words: connect all cells in parallel using bus bars, charge to 3.5V with a power supply, wait 24-48 hours for cells to equalize at exactly the same voltage, then disconnect and assemble in series. Skip top balancing and your BMS will struggle to compensate for cell drift forever.
This guide walks through top balancing from equipment requirements through verified completion. The process takes 1-3 days but produces a foundation that determines pack reliability for the next decade. Builders who skip top balancing or rush it end up with packs that drift, require constant BMS intervention, and reach end-of-life prematurely.
Why Top Balancing Matters
LiFePO4 cells from the same batch arrive within 10-50mV of each other. Connect them in series without balancing and the voltage difference compounds — by the time you reach the top of charge, individual cells are at different voltages despite the pack showing a single voltage.
The BMS tries to compensate but can only burn excess voltage from over-charged cells (passive balancing) or shuffle small amounts (active balancing). Both methods are slow. Without top balancing, the BMS never fully equalizes the cells; pack capacity is permanently limited by whichever cell hits the upper limit first.
With proper top balancing, all cells start at exactly the same voltage. The BMS only needs to manage normal cycle-to-cycle drift (small) instead of fighting initial mismatch (large). Pack capacity matches the cells’ true capacity; cycle life maxes out.
For broader battery context, see our battery chemistry comparison.
Equipment Required

Top balancing requires: a bench power supply with adjustable voltage and current, busbars or thick wire to parallel-connect cells, a multimeter to verify voltages, and a clean working surface large enough for all your cells.
Power supply: Variable DC supply capable of 3.5V at 5-20A. Riden RD6018 (~$80) is a popular DIY choice. Cheaper supplies work for smaller packs (8 cells); larger packs (16+) benefit from higher current capability for faster balancing.
Bus bars: Thick copper bus bars (8 AWG minimum) connect all cell positives in parallel and all cell negatives in parallel. Pre-made busbars from EVE/CATL accessories ($20-50 per set) work well; DIY bars cut from copper bar stock are cheaper.
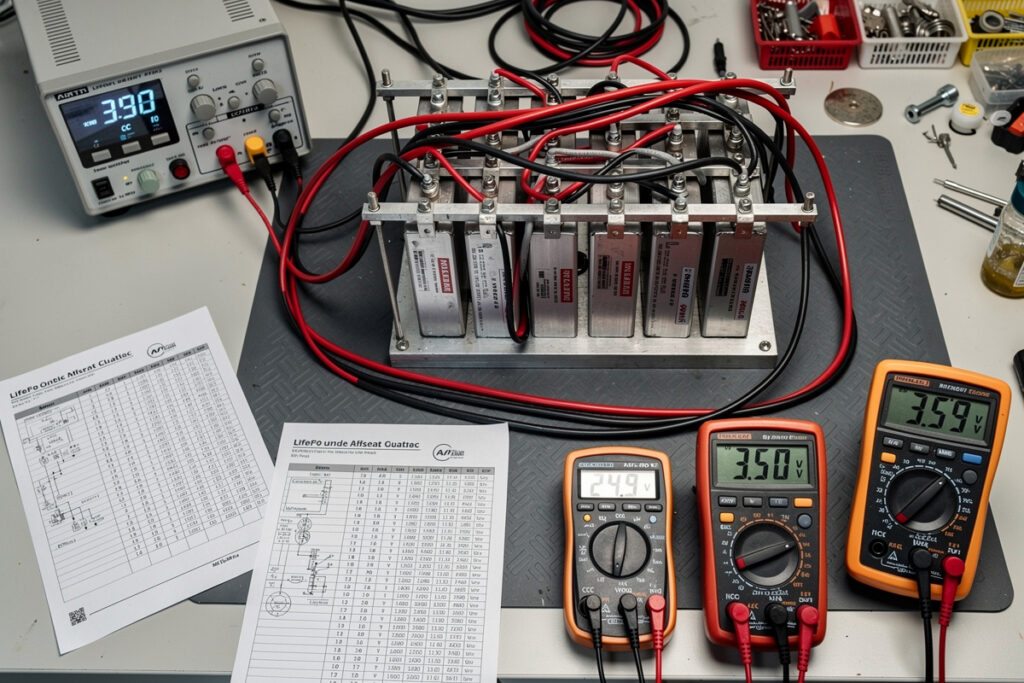
Multimeter: Any digital multimeter with millivolt accuracy. Used to verify cell voltages before, during, and after balancing.
Time: 24-48 hours for the parallel balancing process. Longer is better — extended parallel time produces tighter voltage matching.
Step-by-Step Procedure
Step 1: Verify cell voltages. Measure each cell individually before connecting. Note voltages — they should all be similar (within 50mV) for a fresh batch. Wildly different voltages (200+mV variance) suggest cell quality issues; investigate before continuing.
Step 2: Connect cells in parallel. All positive terminals connect together via busbar. All negative terminals connect together via busbar. The cells are now electrically equivalent — voltage equalizes between them.
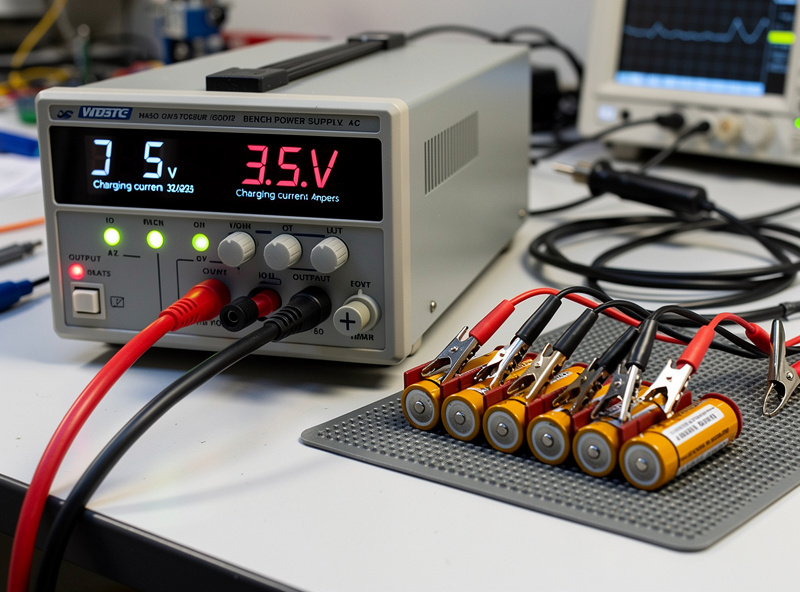
Step 3: Connect power supply. Set supply to 3.5V (or 3.5-3.65V depending on philosophy — see below). Current limit to 5-20A depending on supply capability. Connect supply positive to cell positive busbar, negative to negative busbar.
Step 4: Charge. The power supply pushes current into all cells in parallel. Cells with lower voltage absorb more current; cells already at target voltage stop absorbing. The current display on the power supply slowly drops as cells reach target voltage.
Step 5: Wait. Continue charging until current drops to nearly zero (typically <0.5A on a 16-cell parallel arrangement). At this point cells are essentially equalized.
Step 6: Verify. Disconnect the power supply. Measure each cell voltage individually. All cells should read within 5-10mV of each other. If any cell is significantly different (50+mV), it has an internal issue — investigate before assembling.
Step 7: Disconnect parallel. Remove the bus bars connecting cells in parallel. Each cell now sits at exactly 3.5V independently.
Step 8: Assemble in series. Connect cells in series for the final pack configuration. Voltage at series terminals: cells × 3.5V (e.g., 16 cells × 3.5V = 56V at fully balanced state).
3.5V vs 3.65V Target Voltage
Two schools of thought on top balancing target voltage:
3.5V (conservative): Cells reach 80-90% state of charge. Top balancing happens at this voltage. The pack starts somewhat below full capacity but provides margin against over-voltage during operation.
3.65V (aggressive): Cells reach 100% state of charge. Top balancing happens at full charge voltage. The pack starts at full capacity but operates closer to upper voltage limits.
For most builds, 3.5V is the right choice. The 10-15% capacity sacrifice during balancing is recovered after the first few charge cycles when the BMS allows cells to reach full charge in operation. The voltage margin during balancing reduces stress on cells.
3.65V is appropriate for builds where every Wh matters and operators carefully monitor cell voltages during balancing. Less common in DIY home storage.
Verification After Top Balancing
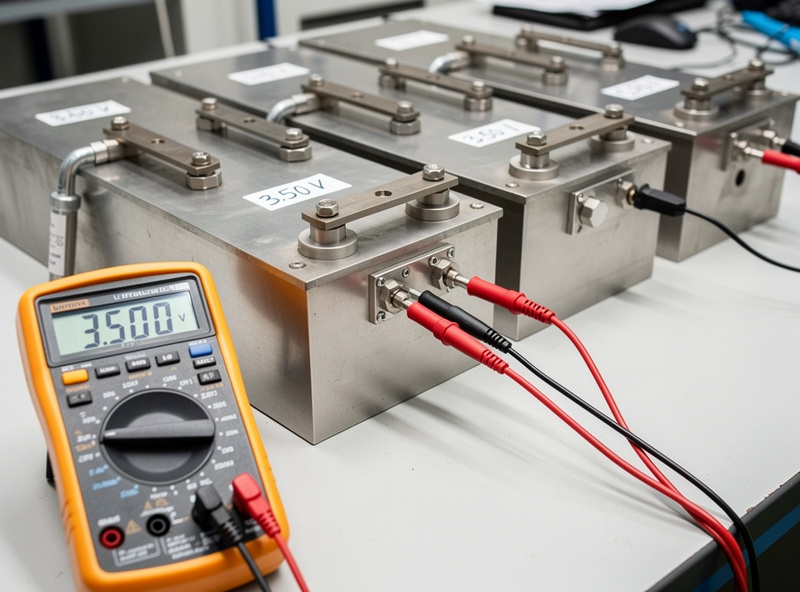
Successful top balancing produces cells that all read within 5-10mV after disconnecting from the parallel arrangement. Verification reading should be done after 5-10 minutes of disconnected rest — initial readings can be slightly different due to surface charge on cell terminals.
If cells differ significantly (50+ mV) after rest period, repeat the parallel balancing for another 24 hours. If differences persist, individual cells have higher internal resistance or partial damage — these are weak cells in the pack.
Some builders test cell capacity after top balancing using a load tester. The capacity test reveals which cells deliver the most amp-hours when discharged from 3.5V to 2.5V. Capacity-matched cells (within 1-2%) produce the most predictable pack behavior.
Document the per-cell voltages and capacities. Keep this baseline data for future troubleshooting — when a pack starts behaving oddly years later, comparing current per-cell voltages to the original top-balanced baseline reveals which cells have aged differently.
Common Top Balancing Mistakes
Mistake 1: Skipping top balancing entirely. Connecting cells in series without first balancing produces packs with permanent capacity loss. The BMS can never fully recover.
Mistake 2: Insufficient parallel time. 4-6 hours is not enough. The chemistry needs 24-48 hours to fully equalize voltages within cells.
Mistake 3: Using cell tabs as bus bars. The thin metal tabs on cell terminals can’t carry balancing currents. Use proper busbars or thick wire.
Mistake 4: Charging at too high current. Pushing 50A+ through parallel-connected cells stresses interconnects and can heat cells unevenly. 5-20A is the safe range for typical setups.
Mistake 5: Not verifying after disconnecting. Cells may show similar voltages while connected in parallel but drift apart after disconnection. Always verify post-disconnect.
For the complete DIY build context including top balancing, see our DIY LiFePO4 build guide.
Frequently Asked Questions
Can I skip top balancing if cells are from same batch?
No. Even cells from the same batch arrive 10-50mV apart due to manufacturing variation. Without top balancing, this difference compounds across the series-connected pack and limits permanent capacity. The 24-48 hour balancing process is mandatory for proper pack performance.
How long does top balancing take?
24-48 hours typically. Time depends on initial voltage spread, power supply current capability, and cell count. Larger packs (16+ cells) take longer because more total amp-hours need to flow through the parallel arrangement. Patience produces better results — cutting time short leaves residual mismatch.
What voltage should I use for top balancing — 3.5V or 3.65V?
3.5V is the conservative standard. 3.65V is acceptable for users who carefully monitor cell voltages during balancing. The 10-15% capacity difference between the two becomes irrelevant after the first few operational charge cycles. 3.5V is recommended for most builds.
Can I top balance with the BMS connected?
No — disconnect the BMS before top balancing. The BMS will interfere with the parallel current flow and may itself be damaged by reverse currents. Connect BMS only after top balancing is complete and cells are configured in their final series arrangement.
Why are my cells reading different voltages after disconnecting?
Surface charge dissipates over 5-10 minutes. Initial readings after disconnecting are unreliable. Wait 5-10 minutes, then measure. If significant differences persist after rest period, the parallel balancing wasn’t long enough or one cell has higher internal resistance.
Can I use a USB power supply for top balancing?
Theoretically yes — USB-C PD at 5V can provide enough current. In practice, USB voltage isn’t precisely 3.5V which means cells charge to slightly different state. Use a proper variable DC supply for accurate balancing. The cost difference ($30-100 for proper supply) is small compared to the potential pack performance impact.
Do prebuilt batteries need top balancing?
Manufacturers top-balance during production, so prebuilt 48V batteries arrive ready to use. After 1-2 years of operation, professional integrators sometimes re-balance batteries that show drift, but this is rare for quality LiFePO4 batteries. DIY builders top-balance once during initial assembly; rebalancing isn’t typically needed for years.